本文参考原文:https://my.oschina.net/hipanda/blog/4695082
Centos7 安装 Redis
一、准备工作
1. 安装相关配件
yum install cpp
yum install binutils
yum install glibc
yum install glibc-kernheaders
yum install glibc-common
yum install glibc-devel
yum install gcc
yum install make
yum install tcl
yum install gcc-c++
2. 升级gcc
$ yum -y install centos-release-scl
$ yum -y install devtoolset-9-gcc devtoolset-9-gcc-c++ devtoolset-9-binutils
$ scl enable devtoolset-9 bash
二、下载并安装
1. 下载tar包,并编译
wget https://download.redis.io/releases/redis-6.2.5.tar.gz
tar xzf redis-6.2.5.tar.gz -C /usr/local
cd /usr/local/redis-6.2.5
make
2. 备份并修改redis.conf配置文件
$ cp redis.conf redis.conf.bak
3.修改redis.conf 配置文件
#      -指定 redis 只接收来自于该IP地址的请求,如果不进行设置,那么将处理所有请求
bind 0.0.0.0
#				-redis服务端口号,默认6379
port 6379
#			-是否后台启动,默认为no
daemonize yes
#	-服务进程文件位置
pidfile /var/run/redis_6379.pid
# -日志文件所在位置
logfile /usr/local/redis-6.2.5/logs/redis_6379.log
#  -RDB文件存储位置
dir /usr/local/redis-6.2.5/data
# -RDB文件的名称
dbfilename redis_6379.rdb
# Redis密码
requirepass 123456
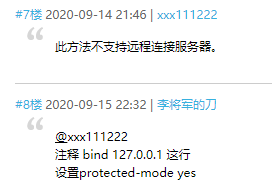
补充:不支持远程连接服务器解决办法
# 注释掉 bind 127.0.0.1
#bind 127.0.0.1
# 设置protected-mode yes
protected-mode yes
4.建立日志目录及新建日志文件,通过 sudo vim 随便输入并保存
mkdir /usr/local/redis-6.2.5/logs
sudo vi /usr/local/redis-6.2.5/logs/redis_6379.log
mkdir /usr/local/redis-6.2.5/data
5. 将src目录下将文件redis-server、redis-benchmark、redis-cli拷贝到一个目录下,建议和redis.conf同一目录
cd /usr/local/redis-6.2.5/src
cp redis-server /usr/local/redis-6.2.5
cp redis-benchmark /usr/local/redis-6.2.5
cp redis-cli /usr/local/redis-6.2.5
6.启动 redis服务
cd /usr/local/redis-6.2.5
./redis-server redis.conf
7. 执行以下命令查看redis是否启动成功
$ ps -ef|grep redis
root      1116     1  0 09:15 ?        00:00:00 ./redis-server 0.0.0.0:6379
root      1399 24586  0 09:16 pts/8    00:00:00 grep --color=auto redis
8.关闭redis服务
$ ./redis-cli shutdown
$ ps -ef|grep redis
root      2153 24586  0 09:20 pts/8    00:00:00 grep --color=auto redis
这里如果提示 (error) NOAUTH Authentication required.说明需要输入密码。
命令修改为:./redis-cli -a 密码 shutdown
例如:`./redis-cli -a 123456 shutdown
9.设置开机启动
(1) 添加开机启动服务:
vi /etc/systemd/system/redis.service
注意:ExecStart配置成自己的路径
[Unit]
Description=redis-server
After=network.target

[Service]
Type=forking
ExecStart=/usr/local/redis-6.2.5/redis-server /usr/local/redis-6.2.5/redis.conf
PrivateTmp=true

[Install]
WantedBy=multi-user.target
(2) 设置开机启动
systemctl daemon-reload
systemctl start redis.service
systemctl enable redis.service
(3) 创建 redis 命令软链接
[root@localhost ~]# ln -s /usr/local/redis-6.2.5/redis-cli /usr/bin/redis
(4) 测试 redis

(5) 服务操作命令
systemctl start redis.service   #启动redis服务
systemctl stop redis.service   #停止redis服务
systemctl restart redis.service   #重新启动服务
systemctl status redis.service   #查看服务当前状态
systemctl enable redis.service   #设置开机自启动
systemctl disable redis.service   #停止开机自启动
三、客户端连接
redis-cli -h host -p port -a password
例1 :
[root@oracledb redis-6.2.5]# ./redis-cli -h 10.22.90.22 -p 6379 -a ""
Warning: Using a password with '-a' or '-u' option on the command line interface may not be safe.
Warning: AUTH failed
10.22.90.22:6379> set username panda
OK
10.22.90.22:6379> del username
(integer) 1
10.22.90.22:6379> quit
[root@oracledb redis-6.2.5]#
例2
# 本地连接
[root@oracledb redis-6.2.5]# ./redis-cli
127.0.0.1:6379> set username panda
OK
127.0.0.1:6379> del username
(integer) 1
127.0.0.1:6379> quit
[root@oracledb redis-6.2.5]#
其他参考:
https://my.oschina.net/hipanda/blog/4695082
以下原文:
https://blog.csdn.net/qq_36628003/article/details/94394867
一、安装gcc依赖
由于 redis 是用 C 语言开发,安装之前必先确认是否安装 gcc 环境(gcc -v),如果没有安装,执行以下命令进行安装
[root@localhost local]# yum install -y gcc
二、下载并解压安装包
[root@localhost local]# wget http://download.redis.io/releases/redis-5.0.3.tar.gz
[root@localhost local]# tar -zxvf redis-5.0.3.tar.gz
三、cd切换到redis解压目录下,执行编译
[root@localhost local]# cd redis-5.0.3
[root@localhost redis-5.0.3]# make
四、安装并指定安装目录
[root@localhost redis-5.0.3]# make install PREFIX=/usr/local/redis
五、启动服务
5.1前台启动
[root@localhost redis-5.0.3]# cd /usr/local/redis/bin/
[root@localhost bin]# ./redis-server
5.2后台启动
从 redis 的源码目录中复制 redis.conf 到 redis 的安装目录
[root@localhost bin]# cp /usr/local/redis-5.0.3/redis.conf /usr/local/redis/bin/
修改 redis.conf 文件,把 daemonize no 改为 daemonize yes
[root@localhost bin]# vi redis.conf

后台启动
[root@localhost bin]# ./redis-server redis.conf

六、设置开机启动
添加开机启动服务
[root@localhost bin]# vi /etc/systemd/system/redis.service
[Unit]
Description=redis-server
After=network.target

[Service]
Type=forking
ExecStart=/usr/local/redis/bin/redis-server /usr/local/redis/bin/redis.conf
PrivateTmp=true

[Install]
WantedBy=multi-user.target
注意:ExecStart配置成自己的路径
设置开机启动
[root@localhost bin]# systemctl daemon-reload
[root@localhost bin]# systemctl start redis.service
[root@localhost bin]# systemctl enable redis.service
创建 redis 命令软链接
ln -s /usr/local/redis/bin/redis-cli /usr/bin/redis
测试 redis

服务操作命令
systemctl start redis.service #启动redis服务
systemctl stop redis.service #停止redis服务
systemctl restart redis.service #重新启动服务
systemctl status redis.service #查看服务当前状态
systemctl enable redis.service #设置开机自启动
systemctl disable redis.service #停止开机自启动


评论区